Article
I Switched From Lightroom to Capture One
Oveth Martinez
8.12.26
I was an avid Lightroom user from the day I picked up a camera in 2016. It was my go-to. I had my VSCO presets loaded, my sliders memorized, and honestly, I made some of my favorite images in that software. Lightroom is where I found my style. For years I was the guy with the California beach vibes, the aqua blue tones and the golden skin tones that everybody wanted.
But things change. Brands expect a certain level of professionalism now, and honestly, I expect the same from myself.
For years I struggled with one specific part of my workflow: client selects. My process looked like this. Export every photo from the shoot at the smallest file size. Upload the whole batch to Pixieset. Send the client the full gallery. Wait for them to make their selects. Then take their list of file sequence numbers, go back into Lightroom, and hunt down every single one by hand.
I did that for years. It was the single biggest waste of my time.
I knew there had to be a better way. I knew Pixieset had a Lightroom plugin, but it never worked reliably for me. Then one night I was on YouTube and stumbled into a Capture One tutorial.
I was hesitant. Switching meant learning an entirely new piece of software and relearning how to edit, which is not a small thing when you have shoots on the calendar. But one feature stopped me cold: the built-in online client proofing gallery. That feature alone would save me hours. I could share images with a client during the shoot and let them make selects while we were still on set.
I switched to Capture One in January 2025 and I have not looked back.
Here is everything that made the switch worth it.


1. The client proofing gallery
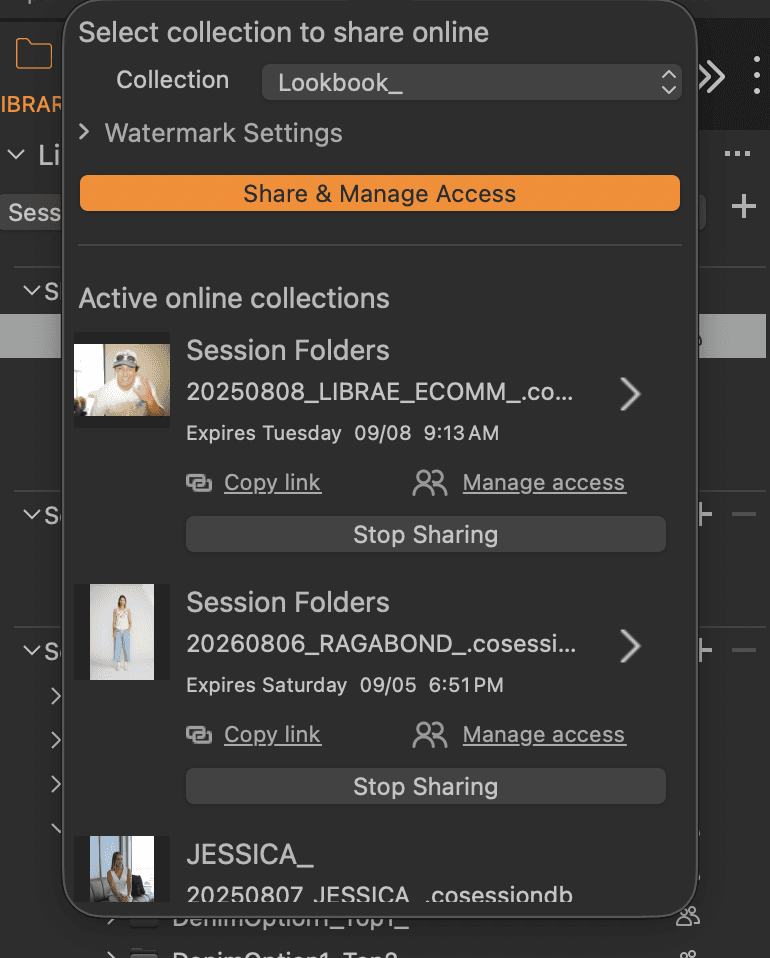
This is the feature that sold me. Capture One Live lets me share a live link to the session, and the client can watch the shoot come in on their laptop, phone, or tablet. No app to download, no account to create on their end. It raised the bar on how professional my sets feel, instantly.
And it does not stop when we wrap. The client keeps access to the gallery so they can make selects on set, or later that week when they are back at the office.
What it actually does:
Live sharing straight from the app. Capture One Live lives in the toolbar as a "Share Online" button. Images appear in the browser as you shoot them. You can share from a Session (Folders and Albums) or from a Catalog Album. Capture One Live overview
Star ratings and color tags sync back to my desktop. This is the whole ballgame. The client's selects come back into Capture One as actual ratings and tags, so I filter and start editing. No more copying sequence numbers into a search bar. Note that comments stay in the web gallery and do not sync back, though you do get emailed a summary of them when the session ends.
Comments on individual images. Clients can leave notes right under a frame, and there is a filter to show only images with comments. Very useful for art director feedback.
Keyboard shortcuts for reviewers. Number keys 0 through 5 for star ratings, letter keys for color tags, arrow keys to move through the gallery. Once a client learns it, they fly.
Watermarks, invite-only access, and email notifications on the paid plan, so you can lock the gallery to specific email addresses and control who can rate, tag, or comment.
No cap on the number of images in a session.
One thing worth knowing before you plan around it: the free plan gives you one live session at a time with 24 hours of uptime. The Unlimited plan is about five bucks a month and gets you unlimited sessions, a month of uptime, watermarks, reviewer management, and email notifications. If you want clients reviewing days after the shoot, you want the paid plan. The full breakdown is here: Capture One Live FAQ and Quick Start Guide for Capture One Live.
2. The editing tools just make more sense
Once I got past the learning curve, I realized I had way more control than Lightroom ever gave me.
The tools I use constantly:
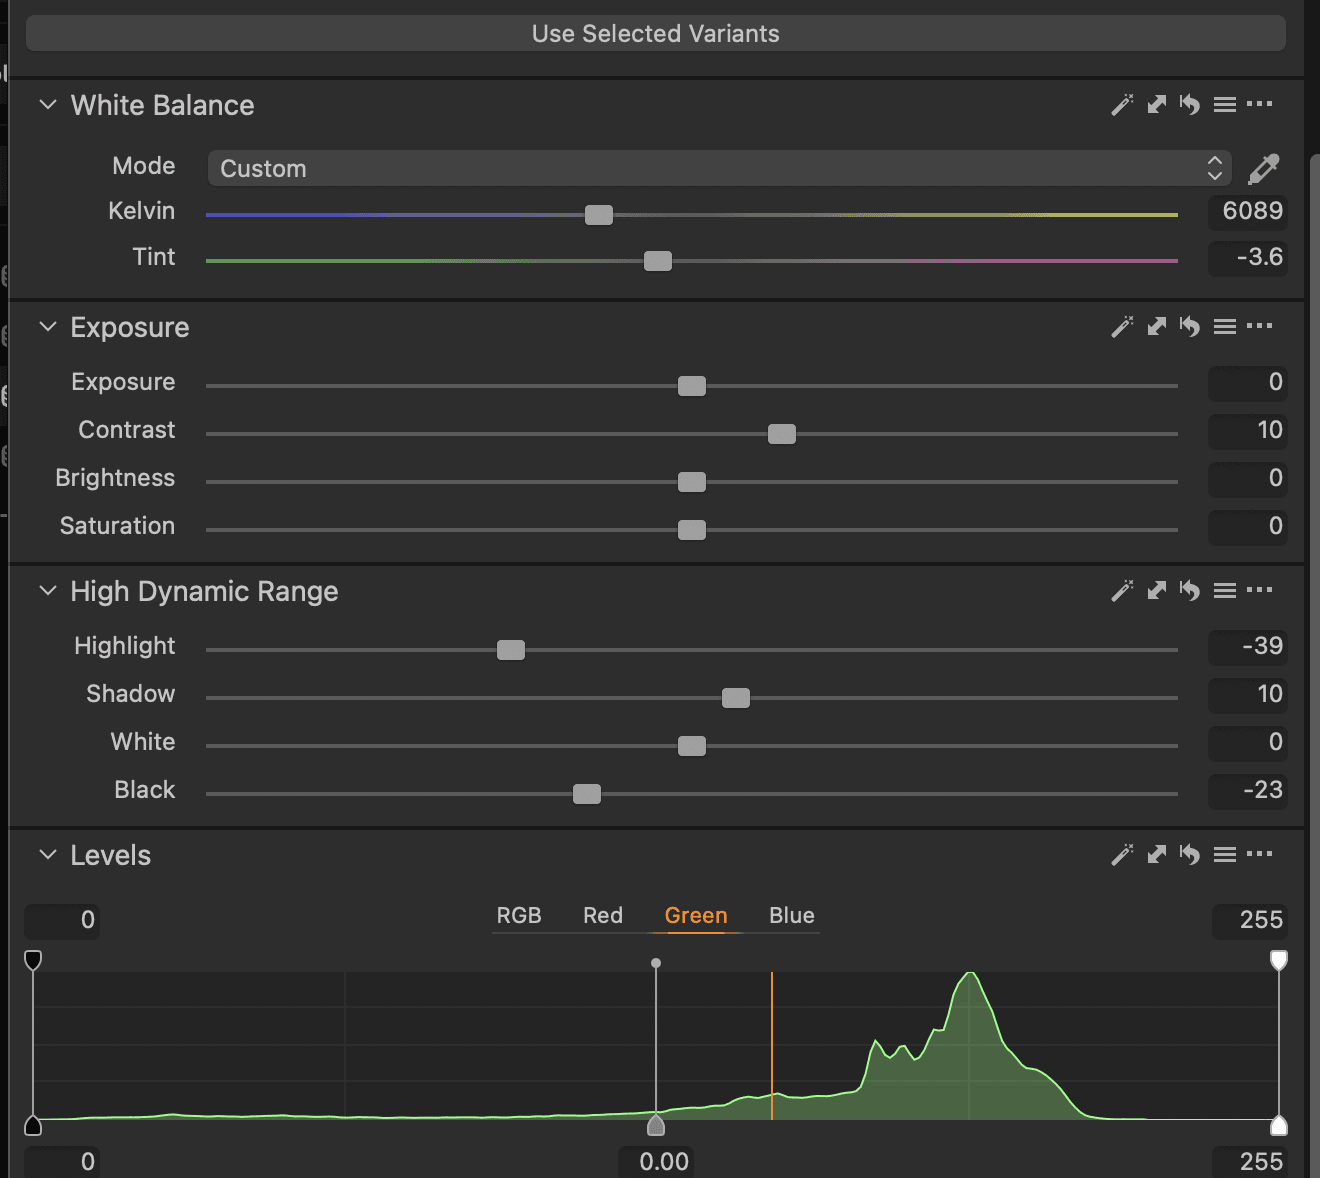
The Color Editor. Three modes: Basic, Advanced, and Skin Tone. I can target one narrow range of color and push it without wrecking everything around it. That aqua blue I am known for? It is a two-minute move in the Advanced tab. The Color Editor overview
The Skin Tone tab. This one changed my portrait and lifestyle work. You eyedropper a midtone area of skin, then use the Uniformity sliders to pull all the surrounding skin tones into line with that target. Blotchy arms, shadowed cheeks, mixed lighting on a beach, all of it evens out. Capture One has a solid walkthrough here: Achieving perfect skin tones
Real layers. Not adjustment brushes stacked in a list. Actual layers with their own masks, which you can build from a brush, a gradient, a luminosity range, or a color range. Making a mask directly from a color selection is something I do on almost every commercial job. Working with a color range selection
Luma curve. Lets me lift shadows or roll off highlights without saturation shifting on me. That alone keeps my film emulation looking like film.
Color Balance wheels for shadows, midtones, and highlights, which is how I get a grade that holds together across a whole campaign.
Custom ICC profiles. You can save a color selection as a profile and reuse it. Handy when a brand has a specific product color that has to match every single time.
The short version: in Lightroom I was nudging global sliders and hoping. In Capture One I am making decisions.
3. File management and tethering
I shoot a lot of ecom now, and I tether on almost every campaign. Part of that is wanting to see exactly what I am getting on a big screen. Part of it is that clients love watching a live edit get applied to every frame as it comes in.
But the real magic is the file management. Capture One keeps a high-SKU day organized in a way Lightroom never did for me.
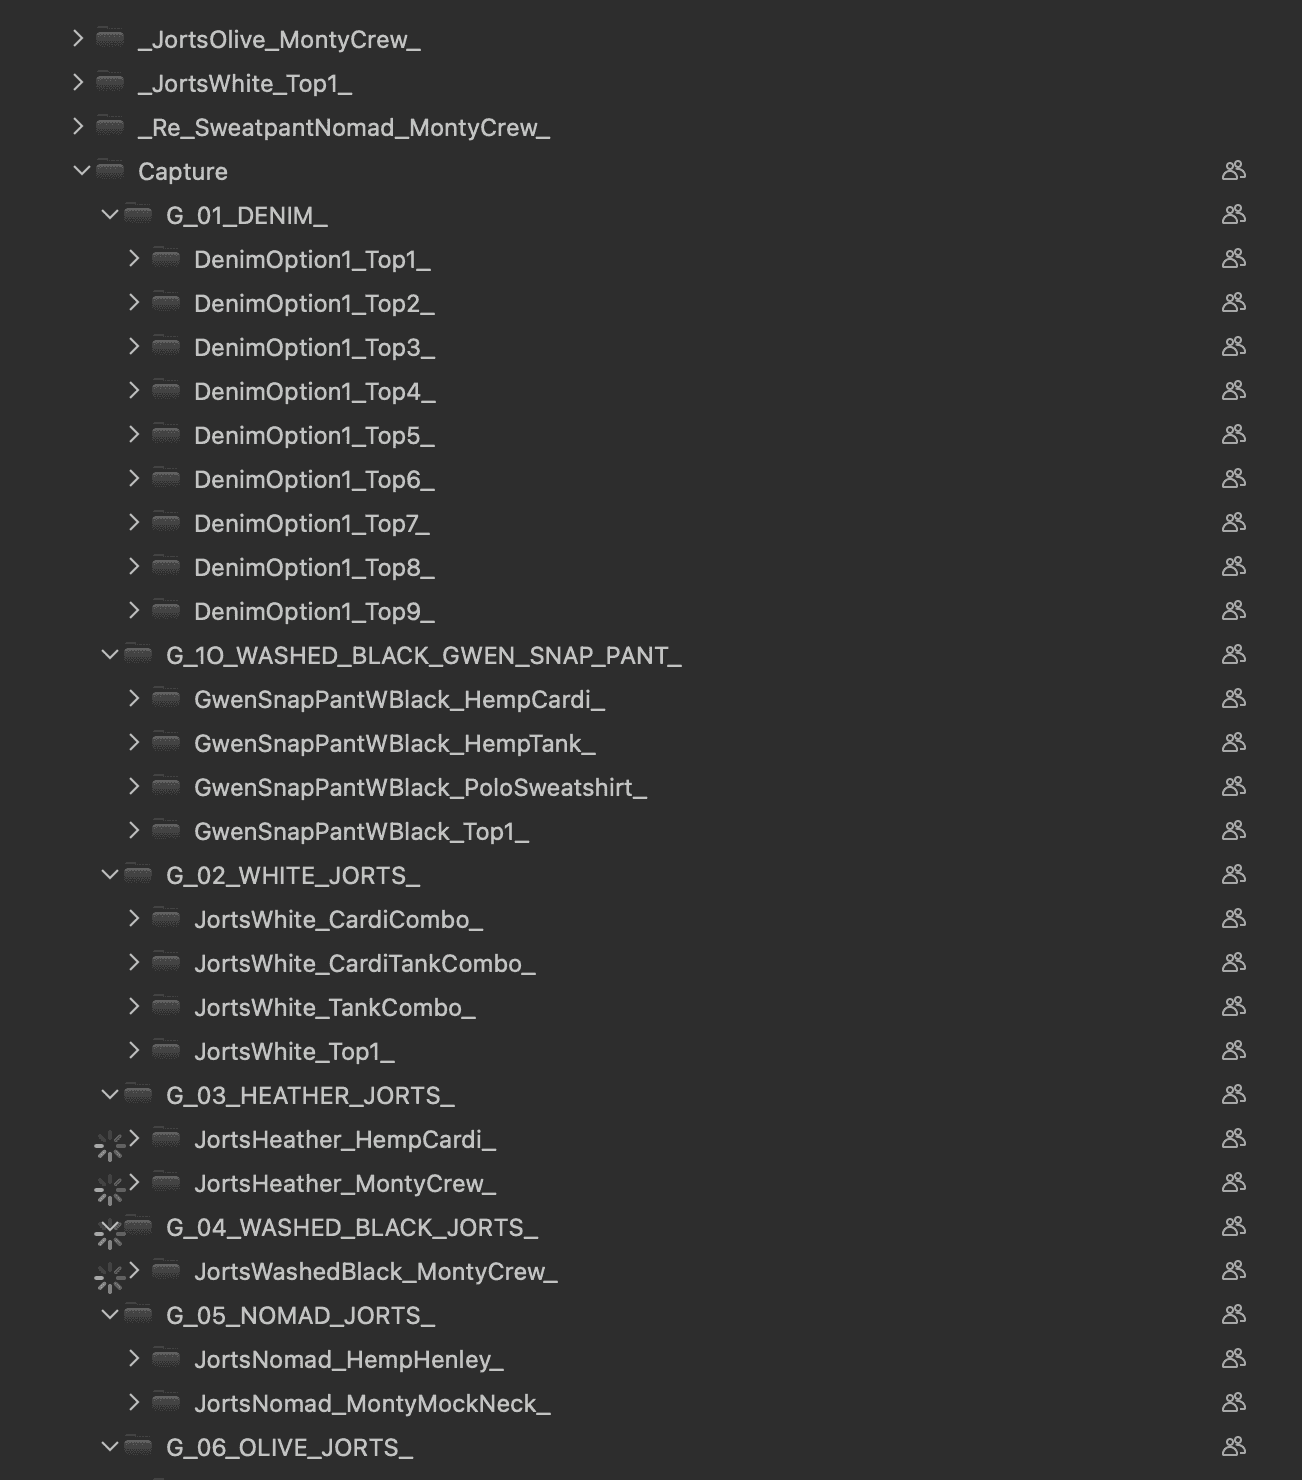
Sessions. A Session is a self-contained folder structure (Capture, Selects, Output, Trash) built for exactly this kind of work. Everything for one job lives in one place, and it travels with the drive. The complete guide to Sessions
Next Capture Naming. Files get named as they land on the computer, not by the camera. I build the name out of tokens, so every frame comes in already labeled with the job, the SKU, or whatever the client's naming convention requires. On an ecom day this is the difference between delivering a clean set and spending your evening renaming files. Naming images when capturing
Next Capture Location. I can point incoming frames at a specific subfolder and switch it as we move between products, so the folders sort themselves in real time.
Session Templates. Save a folder hierarchy once and start every job with the same structure. Starting a tethered Session
Composition Mode. While I am setting up a shot, it only keeps the last frame on disk. No more deleting fifty test frames later.
Next Capture Backup (Capture One Studio) writes a duplicate of every capture to a second drive automatically, with a queue you can pause and resume. Next Capture Backup tool
More on the tethering setup: Tethering with a supported camera and Capture One's own top tips for tethered shooting.
Handing a client a drive where everything is already named, sorted, and where it should be is a huge win for them. It is also one of the things that keeps me on their radar for the next project.
4. Editing while I shoot
Before every shoot, I set up my look. First frame comes in, I apply my preset, and every frame after that arrives already carrying my exact edit.
That is the Next Capture Adjustments tool. You can set it to copy the adjustments from the last capture, or lock it to a specific style or preset so every incoming image is stamped with it automatically. I know Lightroom has a version of this. Capture One does it flawlessly and with no lag, even at 102 megapixels.
On ecom days this is everything. By the time we wrap, the photos are 90 percent done. What is left is minor cleanup, sweeping the floor in post, tidying up the seamless, small stuff. The heavy lifting already happened while we were shooting.
Details on how it works: Tethering with a supported camera
5. The export
Export is quietly one of my favorite things about this software. It is fast, and more importantly, it stays organized when I am pushing high volumes of SKUs.
Process Recipes. You can run multiple recipes on one export. Full-res Adobe RGB TIFFs for retouching and small sRGB JPEGs for the client's deck, processed in the same click, each landing in its own subfolder. Output recipes to multiple folders
Dynamic tokens for folders. Drop a token in the Sub Folder field and Capture One builds and names the folders for you based on metadata. Add a slash between tokens and it nests them. Your delivery structure builds itself. Creating folders from within the recipe
Sub Name and Job Name tokens so file names carry the job or the version, per recipe or globally. Naming and renaming variants on output
Cross Recipe Tokens. Change the job name once and it updates across every recipe instead of you editing each one. Cross Recipe Tokens tool
Recipe Proofing. Soft-proof exactly how a file will look after scaling, compression, sharpening, and profile conversion, before you process a single frame. When a client needs web-sized files at a specific pixel dimension, I know what they are getting. Recipe Proofing tool
Output sharpening per recipe, so downsized web files do not come out soft.
Set the recipes once, save them, and every delivery after that is one click.
6. It is fast and it is reliable
Honestly, it has never lagged on me during a shoot. Well, a couple of times when my laptop got hot from sitting out in the sun, but that is on the weather, not the software.
The interface is clean and sleek, and it reads beautifully on a second monitor, which matters more than you would think. When I bring an extra display to set so the client can see frames at full size, Capture One makes that look intentional and professional.
What this is really about
You may have noticed a theme here. I am all about the client experience.
If I can level up how a shoot feels for the people paying for it, I will do whatever it takes. I want my clients happy, I want them excited, and I want them coming back.
I love repeat clients. I get to learn how they work and what they expect, and every round I raise my own standard on the work, the deliverables, and the presentation. Switching to Capture One was not really about software. It was about closing the gap between the work I was making and the experience I was giving people while I made it.
If you are on the fence, Capture One has a 30-day free trial. Try it on one job. Tether it, share a live link with your client, and watch their face when they realize they can pick their favorites from their phone while you are still shooting.
That was the moment for me.
Share this article
Article
I Switched From Lightroom to Capture One
Oveth Martinez
8.12.26
I was an avid Lightroom user from the day I picked up a camera in 2016. It was my go-to. I had my VSCO presets loaded, my sliders memorized, and honestly, I made some of my favorite images in that software. Lightroom is where I found my style. For years I was the guy with the California beach vibes, the aqua blue tones and the golden skin tones that everybody wanted.
But things change. Brands expect a certain level of professionalism now, and honestly, I expect the same from myself.
For years I struggled with one specific part of my workflow: client selects. My process looked like this. Export every photo from the shoot at the smallest file size. Upload the whole batch to Pixieset. Send the client the full gallery. Wait for them to make their selects. Then take their list of file sequence numbers, go back into Lightroom, and hunt down every single one by hand.
I did that for years. It was the single biggest waste of my time.
I knew there had to be a better way. I knew Pixieset had a Lightroom plugin, but it never worked reliably for me. Then one night I was on YouTube and stumbled into a Capture One tutorial.
I was hesitant. Switching meant learning an entirely new piece of software and relearning how to edit, which is not a small thing when you have shoots on the calendar. But one feature stopped me cold: the built-in online client proofing gallery. That feature alone would save me hours. I could share images with a client during the shoot and let them make selects while we were still on set.
I switched to Capture One in January 2025 and I have not looked back.
Here is everything that made the switch worth it.
1. The client proofing gallery
This is the feature that sold me. Capture One Live lets me share a live link to the session, and the client can watch the shoot come in on their laptop, phone, or tablet. No app to download, no account to create on their end. It raised the bar on how professional my sets feel, instantly.
And it does not stop when we wrap. The client keeps access to the gallery so they can make selects on set, or later that week when they are back at the office.
What it actually does:
Live sharing straight from the app. Capture One Live lives in the toolbar as a "Share Online" button. Images appear in the browser as you shoot them. You can share from a Session (Folders and Albums) or from a Catalog Album. Capture One Live overview
Star ratings and color tags sync back to my desktop. This is the whole ballgame. The client's selects come back into Capture One as actual ratings and tags, so I filter and start editing. No more copying sequence numbers into a search bar. Note that comments stay in the web gallery and do not sync back, though you do get emailed a summary of them when the session ends.
Comments on individual images. Clients can leave notes right under a frame, and there is a filter to show only images with comments. Very useful for art director feedback.
Keyboard shortcuts for reviewers. Number keys 0 through 5 for star ratings, letter keys for color tags, arrow keys to move through the gallery. Once a client learns it, they fly.
Watermarks, invite-only access, and email notifications on the paid plan, so you can lock the gallery to specific email addresses and control who can rate, tag, or comment.
No cap on the number of images in a session.
One thing worth knowing before you plan around it: the free plan gives you one live session at a time with 24 hours of uptime. The Unlimited plan is about five bucks a month and gets you unlimited sessions, a month of uptime, watermarks, reviewer management, and email notifications. If you want clients reviewing days after the shoot, you want the paid plan. The full breakdown is here: Capture One Live FAQ and Quick Start Guide for Capture One Live.
2. The editing tools just make more sense
Once I got past the learning curve, I realized I had way more control than Lightroom ever gave me.
The tools I use constantly:
The Color Editor. Three modes: Basic, Advanced, and Skin Tone. I can target one narrow range of color and push it without wrecking everything around it. That aqua blue I am known for? It is a two-minute move in the Advanced tab. The Color Editor overview
The Skin Tone tab. This one changed my portrait and lifestyle work. You eyedropper a midtone area of skin, then use the Uniformity sliders to pull all the surrounding skin tones into line with that target. Blotchy arms, shadowed cheeks, mixed lighting on a beach, all of it evens out. Capture One has a solid walkthrough here: Achieving perfect skin tones
Real layers. Not adjustment brushes stacked in a list. Actual layers with their own masks, which you can build from a brush, a gradient, a luminosity range, or a color range. Making a mask directly from a color selection is something I do on almost every commercial job. Working with a color range selection
Luma curve. Lets me lift shadows or roll off highlights without saturation shifting on me. That alone keeps my film emulation looking like film.
Color Balance wheels for shadows, midtones, and highlights, which is how I get a grade that holds together across a whole campaign.
Custom ICC profiles. You can save a color selection as a profile and reuse it. Handy when a brand has a specific product color that has to match every single time.
The short version: in Lightroom I was nudging global sliders and hoping. In Capture One I am making decisions.
3. File management and tethering
I shoot a lot of ecom now, and I tether on almost every campaign. Part of that is wanting to see exactly what I am getting on a big screen. Part of it is that clients love watching a live edit get applied to every frame as it comes in.
But the real magic is the file management. Capture One keeps a high-SKU day organized in a way Lightroom never did for me.
Sessions. A Session is a self-contained folder structure (Capture, Selects, Output, Trash) built for exactly this kind of work. Everything for one job lives in one place, and it travels with the drive. The complete guide to Sessions
Next Capture Naming. Files get named as they land on the computer, not by the camera. I build the name out of tokens, so every frame comes in already labeled with the job, the SKU, or whatever the client's naming convention requires. On an ecom day this is the difference between delivering a clean set and spending your evening renaming files. Naming images when capturing
Next Capture Location. I can point incoming frames at a specific subfolder and switch it as we move between products, so the folders sort themselves in real time.
Session Templates. Save a folder hierarchy once and start every job with the same structure. Starting a tethered Session
Composition Mode. While I am setting up a shot, it only keeps the last frame on disk. No more deleting fifty test frames later.
Next Capture Backup (Capture One Studio) writes a duplicate of every capture to a second drive automatically, with a queue you can pause and resume. Next Capture Backup tool
More on the tethering setup: Tethering with a supported camera and Capture One's own top tips for tethered shooting.
Handing a client a drive where everything is already named, sorted, and where it should be is a huge win for them. It is also one of the things that keeps me on their radar for the next project.
4. Editing while I shoot
Before every shoot, I set up my look. First frame comes in, I apply my preset, and every frame after that arrives already carrying my exact edit.
That is the Next Capture Adjustments tool. You can set it to copy the adjustments from the last capture, or lock it to a specific style or preset so every incoming image is stamped with it automatically. I know Lightroom has a version of this. Capture One does it flawlessly and with no lag, even at 102 megapixels.
On ecom days this is everything. By the time we wrap, the photos are 90 percent done. What is left is minor cleanup, sweeping the floor in post, tidying up the seamless, small stuff. The heavy lifting already happened while we were shooting.
Details on how it works: Tethering with a supported camera
5. The export
Export is quietly one of my favorite things about this software. It is fast, and more importantly, it stays organized when I am pushing high volumes of SKUs.
Process Recipes. You can run multiple recipes on one export. Full-res Adobe RGB TIFFs for retouching and small sRGB JPEGs for the client's deck, processed in the same click, each landing in its own subfolder. Output recipes to multiple folders
Dynamic tokens for folders. Drop a token in the Sub Folder field and Capture One builds and names the folders for you based on metadata. Add a slash between tokens and it nests them. Your delivery structure builds itself. Creating folders from within the recipe
Sub Name and Job Name tokens so file names carry the job or the version, per recipe or globally. Naming and renaming variants on output
Cross Recipe Tokens. Change the job name once and it updates across every recipe instead of you editing each one. Cross Recipe Tokens tool
Recipe Proofing. Soft-proof exactly how a file will look after scaling, compression, sharpening, and profile conversion, before you process a single frame. When a client needs web-sized files at a specific pixel dimension, I know what they are getting. Recipe Proofing tool
Output sharpening per recipe, so downsized web files do not come out soft.
Set the recipes once, save them, and every delivery after that is one click.
6. It is fast and it is reliable
Honestly, it has never lagged on me during a shoot. Well, a couple of times when my laptop got hot from sitting out in the sun, but that is on the weather, not the software.
The interface is clean and sleek, and it reads beautifully on a second monitor, which matters more than you would think. When I bring an extra display to set so the client can see frames at full size, Capture One makes that look intentional and professional.
What this is really about
You may have noticed a theme here. I am all about the client experience.
If I can level up how a shoot feels for the people paying for it, I will do whatever it takes. I want my clients happy, I want them excited, and I want them coming back.
I love repeat clients. I get to learn how they work and what they expect, and every round I raise my own standard on the work, the deliverables, and the presentation. Switching to Capture One was not really about software. It was about closing the gap between the work I was making and the experience I was giving people while I made it.
If you are on the fence, Capture One has a 30-day free trial. Try it on one job. Tether it, share a live link with your client, and watch their face when they realize they can pick their favorites from their phone while you are still shooting.
That was the moment for me.
Share this article
Article
I Switched From Lightroom to Capture One
Oveth Martinez
8.12.26
I was an avid Lightroom user from the day I picked up a camera in 2016. It was my go-to. I had my VSCO presets loaded, my sliders memorized, and honestly, I made some of my favorite images in that software. Lightroom is where I found my style. For years I was the guy with the California beach vibes, the aqua blue tones and the golden skin tones that everybody wanted.
But things change. Brands expect a certain level of professionalism now, and honestly, I expect the same from myself.
For years I struggled with one specific part of my workflow: client selects. My process looked like this. Export every photo from the shoot at the smallest file size. Upload the whole batch to Pixieset. Send the client the full gallery. Wait for them to make their selects. Then take their list of file sequence numbers, go back into Lightroom, and hunt down every single one by hand.
I did that for years. It was the single biggest waste of my time.
I knew there had to be a better way. I knew Pixieset had a Lightroom plugin, but it never worked reliably for me. Then one night I was on YouTube and stumbled into a Capture One tutorial.
I was hesitant. Switching meant learning an entirely new piece of software and relearning how to edit, which is not a small thing when you have shoots on the calendar. But one feature stopped me cold: the built-in online client proofing gallery. That feature alone would save me hours. I could share images with a client during the shoot and let them make selects while we were still on set.
I switched to Capture One in January 2025 and I have not looked back.
Here is everything that made the switch worth it.
1. The client proofing gallery
This is the feature that sold me. Capture One Live lets me share a live link to the session, and the client can watch the shoot come in on their laptop, phone, or tablet. No app to download, no account to create on their end. It raised the bar on how professional my sets feel, instantly.
And it does not stop when we wrap. The client keeps access to the gallery so they can make selects on set, or later that week when they are back at the office.
What it actually does:
Live sharing straight from the app. Capture One Live lives in the toolbar as a "Share Online" button. Images appear in the browser as you shoot them. You can share from a Session (Folders and Albums) or from a Catalog Album. Capture One Live overview
Star ratings and color tags sync back to my desktop. This is the whole ballgame. The client's selects come back into Capture One as actual ratings and tags, so I filter and start editing. No more copying sequence numbers into a search bar. Note that comments stay in the web gallery and do not sync back, though you do get emailed a summary of them when the session ends.
Comments on individual images. Clients can leave notes right under a frame, and there is a filter to show only images with comments. Very useful for art director feedback.
Keyboard shortcuts for reviewers. Number keys 0 through 5 for star ratings, letter keys for color tags, arrow keys to move through the gallery. Once a client learns it, they fly.
Watermarks, invite-only access, and email notifications on the paid plan, so you can lock the gallery to specific email addresses and control who can rate, tag, or comment.
No cap on the number of images in a session.
One thing worth knowing before you plan around it: the free plan gives you one live session at a time with 24 hours of uptime. The Unlimited plan is about five bucks a month and gets you unlimited sessions, a month of uptime, watermarks, reviewer management, and email notifications. If you want clients reviewing days after the shoot, you want the paid plan. The full breakdown is here: Capture One Live FAQ and Quick Start Guide for Capture One Live.
2. The editing tools just make more sense
Once I got past the learning curve, I realized I had way more control than Lightroom ever gave me.
The tools I use constantly:
The Color Editor. Three modes: Basic, Advanced, and Skin Tone. I can target one narrow range of color and push it without wrecking everything around it. That aqua blue I am known for? It is a two-minute move in the Advanced tab. The Color Editor overview
The Skin Tone tab. This one changed my portrait and lifestyle work. You eyedropper a midtone area of skin, then use the Uniformity sliders to pull all the surrounding skin tones into line with that target. Blotchy arms, shadowed cheeks, mixed lighting on a beach, all of it evens out. Capture One has a solid walkthrough here: Achieving perfect skin tones
Real layers. Not adjustment brushes stacked in a list. Actual layers with their own masks, which you can build from a brush, a gradient, a luminosity range, or a color range. Making a mask directly from a color selection is something I do on almost every commercial job. Working with a color range selection
Luma curve. Lets me lift shadows or roll off highlights without saturation shifting on me. That alone keeps my film emulation looking like film.
Color Balance wheels for shadows, midtones, and highlights, which is how I get a grade that holds together across a whole campaign.
Custom ICC profiles. You can save a color selection as a profile and reuse it. Handy when a brand has a specific product color that has to match every single time.
The short version: in Lightroom I was nudging global sliders and hoping. In Capture One I am making decisions.
3. File management and tethering
I shoot a lot of ecom now, and I tether on almost every campaign. Part of that is wanting to see exactly what I am getting on a big screen. Part of it is that clients love watching a live edit get applied to every frame as it comes in.
But the real magic is the file management. Capture One keeps a high-SKU day organized in a way Lightroom never did for me.
Sessions. A Session is a self-contained folder structure (Capture, Selects, Output, Trash) built for exactly this kind of work. Everything for one job lives in one place, and it travels with the drive. The complete guide to Sessions
Next Capture Naming. Files get named as they land on the computer, not by the camera. I build the name out of tokens, so every frame comes in already labeled with the job, the SKU, or whatever the client's naming convention requires. On an ecom day this is the difference between delivering a clean set and spending your evening renaming files. Naming images when capturing
Next Capture Location. I can point incoming frames at a specific subfolder and switch it as we move between products, so the folders sort themselves in real time.
Session Templates. Save a folder hierarchy once and start every job with the same structure. Starting a tethered Session
Composition Mode. While I am setting up a shot, it only keeps the last frame on disk. No more deleting fifty test frames later.
Next Capture Backup (Capture One Studio) writes a duplicate of every capture to a second drive automatically, with a queue you can pause and resume. Next Capture Backup tool
More on the tethering setup: Tethering with a supported camera and Capture One's own top tips for tethered shooting.
Handing a client a drive where everything is already named, sorted, and where it should be is a huge win for them. It is also one of the things that keeps me on their radar for the next project.
4. Editing while I shoot
Before every shoot, I set up my look. First frame comes in, I apply my preset, and every frame after that arrives already carrying my exact edit.
That is the Next Capture Adjustments tool. You can set it to copy the adjustments from the last capture, or lock it to a specific style or preset so every incoming image is stamped with it automatically. I know Lightroom has a version of this. Capture One does it flawlessly and with no lag, even at 102 megapixels.
On ecom days this is everything. By the time we wrap, the photos are 90 percent done. What is left is minor cleanup, sweeping the floor in post, tidying up the seamless, small stuff. The heavy lifting already happened while we were shooting.
Details on how it works: Tethering with a supported camera
5. The export
Export is quietly one of my favorite things about this software. It is fast, and more importantly, it stays organized when I am pushing high volumes of SKUs.
Process Recipes. You can run multiple recipes on one export. Full-res Adobe RGB TIFFs for retouching and small sRGB JPEGs for the client's deck, processed in the same click, each landing in its own subfolder. Output recipes to multiple folders
Dynamic tokens for folders. Drop a token in the Sub Folder field and Capture One builds and names the folders for you based on metadata. Add a slash between tokens and it nests them. Your delivery structure builds itself. Creating folders from within the recipe
Sub Name and Job Name tokens so file names carry the job or the version, per recipe or globally. Naming and renaming variants on output
Cross Recipe Tokens. Change the job name once and it updates across every recipe instead of you editing each one. Cross Recipe Tokens tool
Recipe Proofing. Soft-proof exactly how a file will look after scaling, compression, sharpening, and profile conversion, before you process a single frame. When a client needs web-sized files at a specific pixel dimension, I know what they are getting. Recipe Proofing tool
Output sharpening per recipe, so downsized web files do not come out soft.
Set the recipes once, save them, and every delivery after that is one click.
6. It is fast and it is reliable
Honestly, it has never lagged on me during a shoot. Well, a couple of times when my laptop got hot from sitting out in the sun, but that is on the weather, not the software.
The interface is clean and sleek, and it reads beautifully on a second monitor, which matters more than you would think. When I bring an extra display to set so the client can see frames at full size, Capture One makes that look intentional and professional.
What this is really about
You may have noticed a theme here. I am all about the client experience.
If I can level up how a shoot feels for the people paying for it, I will do whatever it takes. I want my clients happy, I want them excited, and I want them coming back.
I love repeat clients. I get to learn how they work and what they expect, and every round I raise my own standard on the work, the deliverables, and the presentation. Switching to Capture One was not really about software. It was about closing the gap between the work I was making and the experience I was giving people while I made it.
If you are on the fence, Capture One has a 30-day free trial. Try it on one job. Tether it, share a live link with your client, and watch their face when they realize they can pick their favorites from their phone while you are still shooting.
That was the moment for me.
Share this article